The AWS EC2 and SSH connection always go hand in hand. As a DevOps engineer, you would always want to connect to your EC2 instance via SSH and perform various tasks.
To connect EC2 via SSH, we must add an inbound rule for port 22 and specify range address. Many times, engineers leave port open to “0.0.0.0/0” even though AWS console warns about it. (Who takes warning seriously unless there is an error, right?). The open SSH port could lead to an attack from outside and thus its very important to secure it.
The AWS System Manager service has introduced new feature called “Session Manager” which allow users to connect to their EC2 without enabling SSH port. Yes, no open port for SSH i.e. port 22 and still we can connect to EC2 instance with SSH terminal!
In this post, we will setup Session manager and connect to EC2 via AWS Console.
Advantages
- Session Manager substitutes SSH for our EC2 instances.
- It is applicable to both EC2 instances and On-Premises environments.
- Apart from replacing SSH for EC2 instances, it enables specific actions on groups of instances, such as patching, automation, compliance enforcement, and monitoring.
- There’s no need for additional ports to access the CLI, enhancing the security of connecting to our instances.
- It logs session activities and commands, offering comprehensive audit trails for compliance adherence and troubleshooting needs.
Assign IAM policy to EC2 instance
The EC2 instance should have a IAM role attached so that Session Manager can access it. We can setup the role as below:
- Login to AWS Console
- Open EC2 Dashboard
- Select target EC2 instance in list
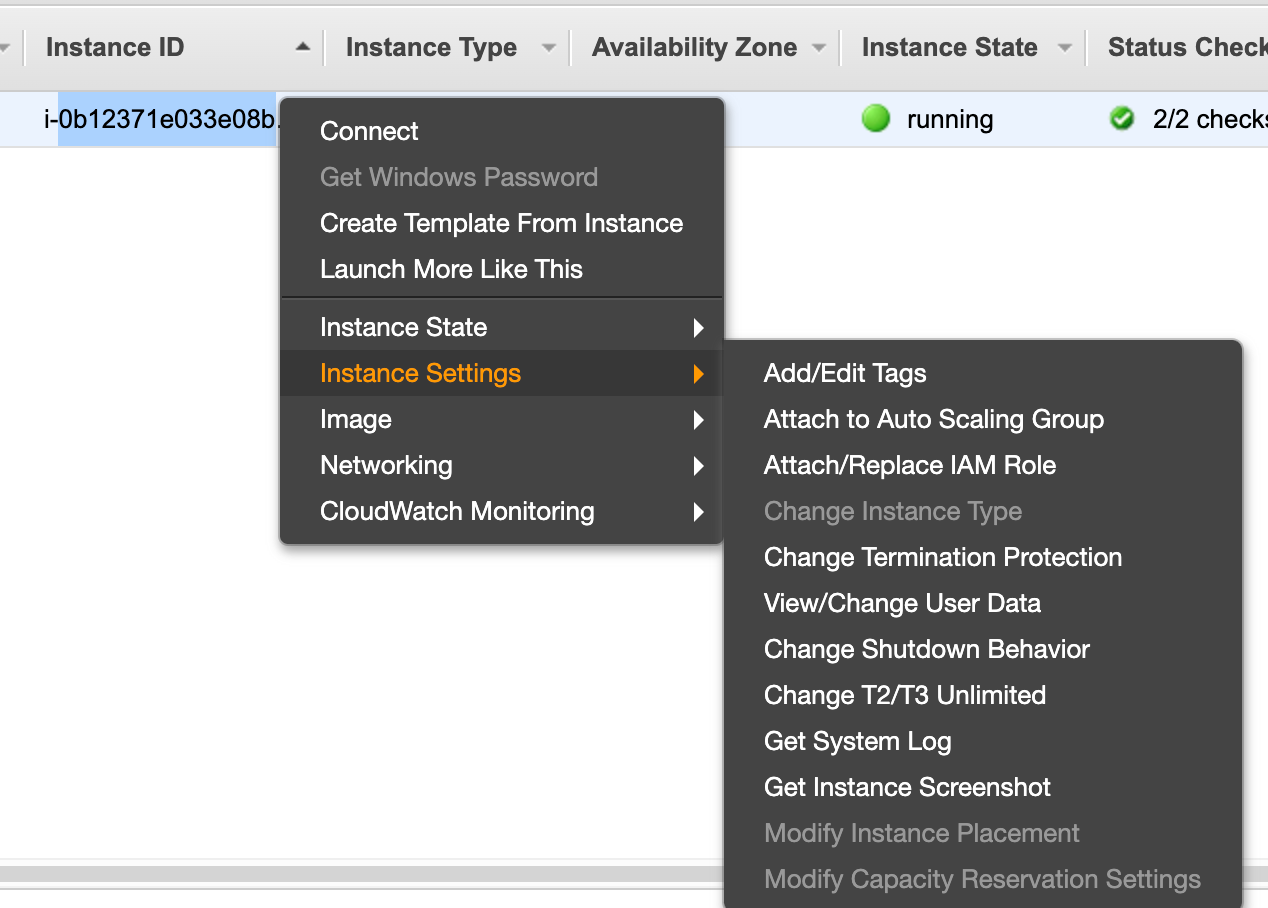
- Right click on EC2 instance and select “Instance Settings -> Attach/Replace IAM Role” as shown in figure.

- Create IAM Role for EC2:
- Go to IAM → Create Role
- Select EC2 as the service
- Attach policy:
AWSSystemsManagerInstanceCore
- Prepare EC2 Instance:
- Attach the created IAM role to EC2
- Ensure EC2 has internet access (via Internet Gateway or NAT Gateway)
- Verify SSM Agent is installed (comes pre-installed on Amazon Linux 2)
- Check Security Group – no inbound SSH rule needed
- Verify Instance is Ready:
- Go to Systems Manager → Fleet Manager
- Your EC2 should be listed as “Managed instance”
- Status should show as “Online”
- Connect via AWS Console:
- Go to Systems Manager → Session Manager
- Click “Start Session”
- Select your EC2 instance
- Click “Start Session”
- You’ll get a terminal session in your browser
To connect to your instance using the Amazon EC2 console
- Open the Amazon EC2 console at https://console.aws.amazon.com/ec2/.
- In the navigation pane, choose Instances.
- Select the instance and choose Connect.
- Choose the EC2 Instance Connect tab.
- For Connection type, choose Connect using EC2 Instance Connect.
- If there is a choice, select the IP address to connect to. Otherwise, the IP address is selected automatically.
- For Username, verify the username.
- Choose Connect to establish a connection. An in-browser terminal window opens.
Connecting to private EC2 instance via Session manager
- Choose the instance.
- Click on
Connect. - Go to
Session Managertab.

- Click on
Connectto connect via Session Manager.
Conclusion
In conclusion, utilizing AWS Session Manager to connect to private EC2 instances offers a streamlined, secure, and efficient solution for managing remote access. By eliminating the need for SSH keys, bastion hosts, or VPNs, Session Manager simplifies the access process while enhancing security. Its ability to work seamlessly with private subnets and across multiple availability zones ensures high availability and reliability. Moreover, Session Manager provides detailed audit trails, enabling robust compliance monitoring and troubleshooting capabilities. This service not only simplifies the management of remote connections but also strengthens the overall security posture of AWS environments, making it a valuable tool for organizations seeking efficient and secure access to their private EC2 instances.


Leave a Reply