Why ECS Fargate?
- No need to manage and provision server
a. ECS will always keep your containers up to date with required security and OS patches.
b. ECS will automatically scale-up and scale-down the infrastructure as per usage. - Resource Efficiency and Cost saving
a. Resource requirements as per your need to run each service. This way resources are never over or under provisioned to run the service.
b. This comes with a great discount as well. Check AWS documentation for fair pricing. - Security by Design
ECS tasks runs in their own dedicated environment and do not share CPU, memory, storage, or network resources with other tasks. This way traffic can be restricted to each task and creates a workload isolation. - No need to worry about underlying host
Many services can be run as per requirement without worrying about the underlying host capacity. This is the biggest advantage to use fargate over non-fargate containers as no need to limit services based on the underlying host capacity. - Rich monitoring
ECS Fargate is having default integration with AWS CloudWatch Container Insights. Using this you can get logs and setup monitoring as per your need. - Better performance and easy deployment
a. Containers can be started and stopped in seconds as per need.
b. As ECS uses the docker underlying, services can be deployed to ecs easily without changing the code.
What will we achieve in this article?
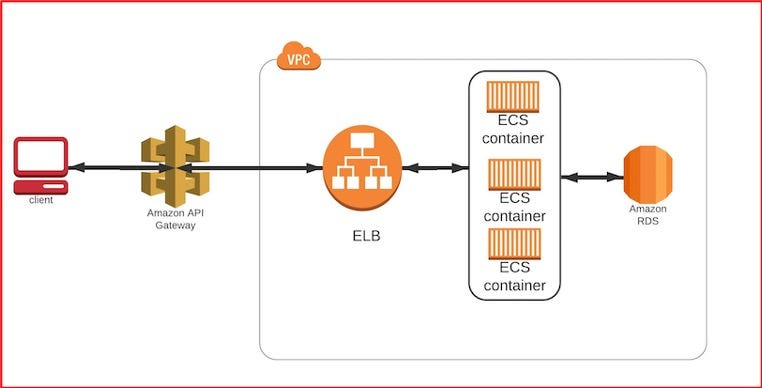
- We will deploy services in ECS Fargate containers.
- We will expose the service using AWS API gateway.
- We will deploy a DB in an RDS instance.
- We will setup the monitoring on ECS containers to notify for any failures or issues.
What you should already know?
- Basic understanding of docker and have a docker environment setup on your laptop.
- Understanding of microservices and how to build docker images out of it.
- Basic understanding of AWS RDS and how to create DB schema.
- You should have an AWS account and basic understanding of Networking and security in AWS.
- Basic understanding about load balancing and API gateway.
Prerequisites?
- 1. You should be having your own VPC created with minimum 2 public and 2 private subnets and a bastion host to access your internal DB.
- You should be having two set of microservices (Example: one for students and one for subjects) and each set should be packaged in a docker image
- Your microservices can communicate internally with each other (this will be explained in inter-service communication section).
How will we achieve this?
- Create a Mysql RDS instance
- Create ECS Fargate cluster.
- Create AWS ECR Repository.
- Upload the docker images to AWS ECR.
- Create Application load-balancer.
- Deploy images in ECS Fargate as containers.
- Setup inter-service communication with ALB.
- Expose API endpoints via API gateway for private endpoints.
- Setup Cloud watch alarms for monitoring.

Create MYSQL RDS instance
- Login to AWS Console.
- Choose your preferred regions, like us-west-2
- Go to RDS service and create a Mysql Database (non-public with in your VPC with private subnets) from there.
- Create the schema inside Database server and configure as per your services requirement .
Create ECS Fargate cluster
“Fargate cluster” needs to be created first, under which services can be deployed inside containers.
- Login to AWS Console.
- Choose your preferred region, like us-west-q 2.
- Go to ECS Service Page.
- Click on “Create Cluster” button.
- Select “Networking only” and click “Next”.
- Provide a name like “ecs-fargate-cluster-demo”.
- Don’t Select “Create VPC” as we will be using existing VPC.
- Select “CloudWatch Container Insights” check box and click create.
ECS Fargate cluster is created. Isn’t easy? You can take a look at your cluster.We have not deployed anything there so, you will see an empty container.
Create AWS ECR Repository
ECR repository is a private docker registry. You can upload your docker images inside ECR repository ( preferably) but you can use your docker hub repo as well. This service is highly secure and having high availability. For more information you can check AWS documentation on this.
- Inside ECS Landing page, you will find a link to go to ECR repository in left menu or you can go directly by using like here.
- Click on create repository and provide the name “demo1″ of the repository here ( Like for Students docker image).
- Click on “create repository” button.
- Create another repository with name “demo2” (Like for Subjects docker image).
Upload your docker images to AWS ECR
Time to upload docker images in ECR repository created above.
We have created two ECR repository for two docker images to showcase “inter service communication”.
You can have services those needs to communicate between each other before they respond to customer.
Make sure you have AWS CLI setup on your laptop.
- Get the push commands to upload these images to your ECR repo.
a. Go to your ECR repository console.
b. Select the repository and click on “View push commands”.
c. It will open a popup and will show all the commands you need to push the images to ECR.
d. Push demo1 image in demo1 repository and demo2 image to demo2 repository
Create Application Load Balancer
There are multiple ways to setup inter service communication where one service communicates with other service. In the micro-service architecture, one service don’t know the location of the other services and can’t connect automatically as each service is located in its own container and having a different private IP address. In the world of containers, container’s IP addresses can’t be reliable as they can be changed if created again.
There are various ways to handle this but “Application load balancer” is much more efficient and simple to use. Each service will register itself to Application load-balancer first and then service can call the “Application load-balancer” along with its service path to communicate with other service.
Like: http://<application load balancer DNS name>/student
Where “/student” will be the path of the other service, registered in “application load balancer”.
When you have multiple containers of each service, application load balancer will redirect the traffic to least used node and this way it will make sure load is always balanced between each container holding same service.
Let’s create one Application load-balancer now.
- Login to AWS console.
- Go to EC2 Console and select the desired region where you have created your VPC above.
- Click on “Load Balancers” from the left menu.
- Click on “Create Load Balancer” button.
- Click “create” for “Application Load balancer”.
- Fill the form with the below information
a. Scheme: Internal (This is because we will be exposing all services using API gateway not directly via load balancer.)
b. IP address type: ipv4
c. Load Balancer Protocol: 80
d. VPC: Select your created VPC.
e. Availability Zones: Select all available zone and select “public subnets” only. - Click on “Next: Configure Security Settings” button.
a. As we are using listener port as 80 and not 443 (with ssl), we will not get the option to setup security configurations. In production you should always use 443 as port with ssl and configure these settings. - Click on “Configure Security Groups” button.
a. Assign a security group: “Create a new security group”
b. Security group name: Give any name. Like: “ecs-fargatel-elb-grp” - Click on “configure routing” button.
Let’s create one “Target Group” now for one service and will create and attach another one later.
a. Name: ecs-fargate-demo1-tg
b. Target type: IP
c. Keep all setting default except Path for “Health Check”.
Path = /health-check - Click on “Next: Register Targets” button (As we have not deployed any service yet, we don’t have any target. We will setup this later).
- Click on “Next: Review” and hit “Create”.
This will create the “Application load balancer” in some time along with one target group “ecs-fargate-demo1-tg”
We have added health check path as “/health-check”. “Target group” keeps hitting this path in regular intervals defined in health-checks to get the health of the service. We should create “/health-check” path in each service just for this purpose. Target group will get 200 as response code once it hits this endpoint for any service deployed in containers.
Go to “Target Group” page and create another target group with name “ecs-fargate-demo2-tg” with same configuration for other service.
Deploy images in ECS Fargate as containers and setup inter service communication
We need to deploy the pushed images to create containers now.
Let’s understand and create the below three IAM roles before we create any container.
- Task Role: This role is used to provide access to your services deployed in ECS containers to communicate with other AWS services. “AmazonECS_FullAccess” policy is required for this role to work.
- Task execution role”: This role is required by tasks to pull container images and publish container logs to Amazon CloudWatch on your behalf. “AmazonECSTaskExecutionRolePolicy” policy is required for this role to work.
- ECS Auto Scale Role: This role will be used to allow ECS to auto-scale ecs tasks based on load. “AmazonEC2ContainerServiceAutoscaleRole” policy is required for this role to work.
Now, Let’s understand some of the popular terms used in ECS.
- Task Definition: This is defined very beautifully here. This defines the configuration of the container which holds your service. Like: memory, CPU and which image should be used etc.
- Task: Runtime instance of “Task Definition”.
- Service: This defines the way your “Task” will behave in the ECS cluster. You can configure “Auto scaling”, setup inter service communication using “Application load balancer”. You can also define the number of tasks for each “Task Definition” and their deployment strategy for handling load/availability. It’s kind of an orchestration engine for your containers.
You can directly deploy “Task Definitions” and create Task out of it. But you will not be able to take the advantages offered by Service. You need to manually setup the inter service communication and can’t use auto scaling.
Let’s deploy the images we have pushed in ECR
Create Task Definitions
- Login to AWS Console.
- Go to ECS Console and select the desired region where you have created your VPC above.
- Click on “Task Definitions” from the left menu.
- Click on “Create new Task Definition” button.
- Select “Fargate” as launch type.
- Click on “Next Step” and fill the form with below information.
a. Task Definition Name: ecs-fargate-demo1-td
b. Task Role: This is the IAM role we have created above.
c. Network Mode: awsvpc
d. Task execution role: This is the IAM role we have created above.
e. Task memory (GB): 0.5 GB (This is the maximum memory your task can consume).
f. Task CPU (vCPU): 0.25 vCPU (This is maximum CPU units your task can consume). - Click on “Add Container”.
a. Container name: “ecs-fargate-demo-1-container”
b. Image: ECR repository URL. You can get the URI from ECR repository you have created above.
c. Memory Limits (MiB): Soft limit: 100 MiB
d. Port mappings: 80
e. Leave all settings as default and hit “Add”. - Click “Create”.
This will create the task definition for one image and create the similar task definition for another pushed image.
Create Service
- Select your created “Task Definition” above.
- Select Action “Create Service”.
- Fill the form like below:
a. Launch type: Fargate
b. Service name: ecs-fragate-demo1-service
c. Number of tasks: 2
d. Minimum healthy percent: 50
e. Maximum percent: 100 - Click on “Next step”
- Fill the form like below
a. Cluster VPC: Select your VPC.
b. Subnets: Select private subnets (Instance under this subnet can’t be accessed from outside directly).
c. Security groups: Click edit and create a new security group
1. Security group name: “ecs-fargate-containter-sg”
2. Inbound rules for security group: Add the new custom rule for port 80 and add “Application load balancer” security group we have created above as source.
3. Hit save to create security group.
d. Auto-assign public IP: Disabled.
e. Load balancer type: “Application Load Balancer”.
f. Load balancer name: ecs-fatgate-elb.
g. Click on “Add to load balancer”.
1. Production listener port: Select the listener port we have created above.
2. Target group name: ecs-fargate-demo1-tg
h. Uncheck “Enable service discovery integration” - Click on “Next Step”.
- Service Auto Scaling: Configure Service Auto Scaling to adjust your service’s desired count.
a. Minimum number of tasks: 2
b. Desired number of tasks: 2
c. Maximum number of tasks: 4
d. IAM role for Service Auto Scaling: ECS Auto scale IAM role we have created above
e. Scaling policy type: Step scaling
f. Execute policy when: Create new Alarm
f. Scale out
1. Alarm name: ECS_Fargate_Container_Scaleout_CPU_Utilisation
2. ECS service metric: CPUUtilisztion
3. Alarm threshold: Minimum of CPUUtilisztion > 70 for 1 consecutive periods of 5 mins.
4. Scaling action: Add 1 Tasks when 70 <= CPUUtilisztion
g. Scale in
1. Alarm name: ECS_Fargate_Container_Scalein_CPU_Utilisation
2. ECS service metric: CPUUtilisztion
3. Alarm threshold: Minimum of CPUUtilisztion < 50 for 1 consecutive periods of 5 mins
4. Scaling action: Remove 1 Tasks when 50 > CPUUtilisztion - Click on Next Step and Create the service.
Let’s understand the above configurations.
- Minimum and Maximum healthy percent:
a. This will configure the number of tasks should be present at any given time.
b. During deployment, ECS will first bring down the number of tasks defined via “Minimum healthy percent” and start the new tasks with new “task definition version” and once the health check of “Target group” is passed it will bring down the rest of the containers and start new one based on “Maximum healthy percent“. This way your service will always be available at any given time. - Security groups: We have created a security group for the tasks and allowed only “Application load balancer” to communicate with them
- Auto-assign public IP: This way we made sure that all our containers will not be accessible outside network.
- § Service Auto Scaling: In case of CPU utilisation of the container is more than 70% for continues 5 mins, then it will add one more task. In case CPU utilisation of the container is less than 50% for continues 5 mins, then it will remove one task. But the minimum and maximum number of tasks will always be maintained.
You can use the same configuration for creating another Service and configure “Auto scaling” with existing alarms we have created above.
This way we have deployed our services in ECS clusters. But still inter service communication is not complete as we have not defined the paths in Application load balancer (ALB).
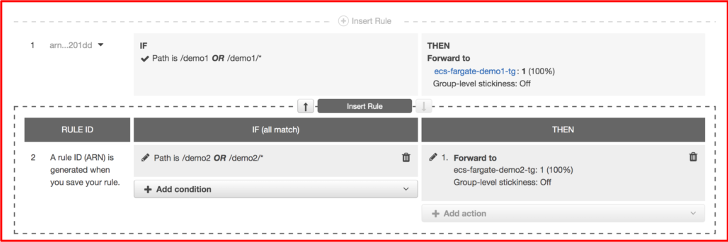
Setup inter service communication with ALB
With previous steps, we have made sure that each task will register itself with ALB while creating. But we have not yet setup the API calls directions to services based on the paths like below:
If one service makes a call like “http://<ALB NAME>/demo1” it should reach to demo1 service and if call is like “http://<ALB NAME>/demo2” then it should reach to demo2 service.
- Go to EC2 console and click on “Load Balancers”.
- Select your created ALB and go to “Listeners” tab.
- Click on “View/edit rules”
- Click on “+” sign and Insert a rule below.
a. Add Condition: Path
1. is /demo1
2. or /demo1/* - Click ok
- Add Action below
a. Forward to
b. Select Target Group: ecs-fatrgate-demo1-tg - Click ok.
- Add another rule for “demo2” service path and configure their target group “ecs-fatrgate-demo2-tg”in action and save the rules.
Expose API endpoints via API gateway
AWS API Gateway is managed service for creating and publishing APIs with security and scale. API Gateway is capable of handling hundreds of thousands of concurrent requests.
We will expose our services as Rest API via “API Gateway”. Our services are hosted inside VPC and can’t be accessed via internet currently. We need to use “API Gateway” private integration to expose our private endpoints via “API Gateway”.
Create Network Load Balancer
- Login to AWS console of EC2 on the same region where you have created VPC.
- Select “Load Balancers” from the left menu.
- Click on “Create Load Balancer” button.
- Fill the details like below
i. Name: “ecs-fargate-nlb”
ii. Scheme: internal
iii. Load Balancer Protocol: TCP: 80
iv. VPC: Select your VPC.
v. Availability Zones: Select all the available zones
vi. Subnets: Select all the public subnets we have created - Click “Next: Configure Security Settings”
- Click “Next: Configure Routing”.
- Create the target group like below
i. Name: ecs-fargate-nlb-group
ii. Target type: IP
iii. Protocol: TCP
iv. Port: 80 (On this port ALB is listening). - Click “Next: Register Targets”.
- We will add ALB IP addresses later.
- Click “Next: Review” and hit create to create the NLB (network load balancer).
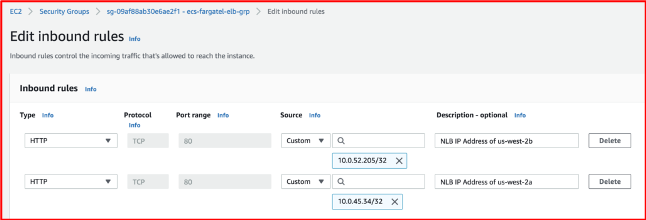
Setup the Integration between NLB and ALB
API gateway will send the traffic to NLB and NLB will route the traffic to ALB. We need to setup this communication. To do so, we need to find the IP addresses of both ALB and NLB. You can check this link to get the IP addresses. As both are added in multiple subnets, both will have multiple IP addresses.
- Add the ALB IP addresses in NLB target group we have created above with name “ecs-fargate-nlb-group”.
- Add the IP addresses of NLB in security group of ALB we created above as inbound rule on port 80.
Create VPC Links
We need to create “VPC Links” in API Gateway to send traffic to NLB, created above.
- Login to API Gateway console.
- Click on “VPC Links” option in left menu.
- Click create and fill the required details like below:
a. Select “VPC link for REST APIs” and click create.
b. Name: ecs-fargate-vpc-link
c. Target NLB: Select the NLB created above.
d. Click create to create the VPC link
Create Rest API
- Login to API Gateway console.
- Select “APIs” from left menu.
- Click on “Build” for “Rest API”.
- Select “Rest” and “New API”.
- Give a name like “ecs-fargate-api”.
- Endpoint Type: Regional
- Click create.
- Click on “Actions” and select “Create Resource”.
- Give the name as “student” and click on “Create Resource”.
- Select the resource and Click on Actions.
- Click on “Create Method”.
- Select “POST” from drop down and click “ok” next to it
a. Select “Integration Type” as “VPC Link”
b. Select “Use Proxy Integration”
c. Method: POST
d. VPC Link: Select the “VPC Link” we have created above.
e. Endpoint URL: http://<DNS Name of ALB>/student/
f. Hit Save - Select the resource “student” and Click on Actions.
- Click on “Create Resource”.
a. Resource Name: {student_id}
b. Resource Path: {student_id}
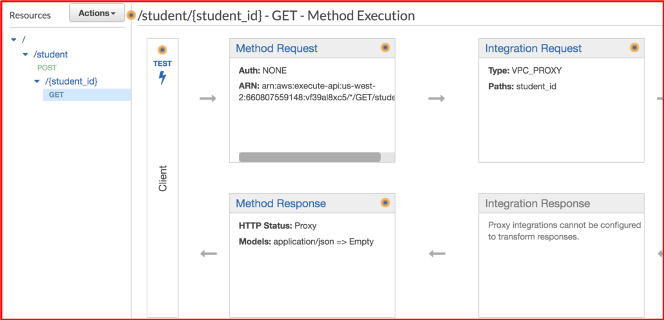
c. Hit “Create Resource”. - Select the resource “{student_id}” and Click on Actions.
- Click on “Create Method”.
- Select “GET” from drop down and click “ok” next to it.
a. Select “Integration Type” as “VPC Link”
b. Select “Use Proxy Integration”
c. Method: GET
d. VPC Link: Select the “VPC Link” we have created above.
e. Endpoint URL: http://<DNS Name of ALB>/student/{student_id}
f. Hit Save
Let’s Deploy the API and test the API
- Select Actions and select “Deploy API”
- Deployment stage: [New Stage]
- Stage name: Test
- Hit Deploy to deploy the API.
Copy the invoke URL and test in postman.
There are lot we can do with API gateway. Few are listed below:
- Add Authorizer to authorize the requests of APIs.
- You can check your headers, request body to validate the request.
- You can update the response in case of errors.
- Add Custom name of the API.
- Create multiple versions of the API.
- Add Firewall to restrict the requests based on different conditions.
- Add throttling of APIs based on the client applications.
- Add logging and monitoring to get the insights of the APIs.

Leave a Reply