Automating database object deployments in Amazon Aurora using AWS CodePipeline involves a structured approach using several AWS services. Here’s a breakdown of the process and key considerations:
1. Source Code Repository (AWS CodeCommit, GitHub, etc.):
- Store your database schema definitions (DDL scripts) in a version-controlled repository. This allows for tracking changes, rollbacks, and collaboration. Use formats like SQL scripts, Liquibase changelogs, or Flyway migrations.
- Organize your scripts logically (e.g., by object type, release version).
2. Build Stage (AWS CodeBuild):
- This stage prepares your deployment artifacts. Since you’re dealing with database objects, “building” typically involves packaging the DDL scripts or changelogs into a deployable format.
- Buildspec.yml: Define the build commands. This file is crucial.
In a modern and agile software development, manual database code deployments can be a significant bottleneck. Database administrators and developers often find themselves grappling with time-consuming, error-prone processes when pushing changes to production environments. From managing schema modifications to deploying stored procedures and views, the challenges of manual deployments can lead to increased downtime, inconsistencies across environments, and potential data integrity issues.
By using AWS CodePipeline to automate database object deployments in Amazon Aurora, teams can improve their workflow, providing faster, more reliable, and consistent updates to their database infrastructure.
In this post, we show you how to use CodePipeline to streamline your Aurora database deployments. We dive into a detailed architecture and steps for using CodePipeline in conjunction with AWS CodeBuild and AWS Secrets Manager. By the end of this post, you’ll have a clear understanding of how to set up a robust, automated pipeline for your database changes, allowing you to focus on what really matters—delivering value to your customers through innovative features and optimized performance.
CodePipeline is a continuous delivery service you can use to model, visualize, and automate the steps required to release your software. You can quickly model and configure the different stages of a software release process. CodePipeline automates the steps required to release your software changes continuously.
CodeBuild is a fully managed continuous integration service that compiles source code, runs tests, and produces software packages that are ready for deployment. By using CodeBuild to eliminate the need to provision, manage, and scale build servers, developers can focus on writing code while CodeBuild handles the complexities of building and testing applications in a scalable and secure environment.
Solution Overview
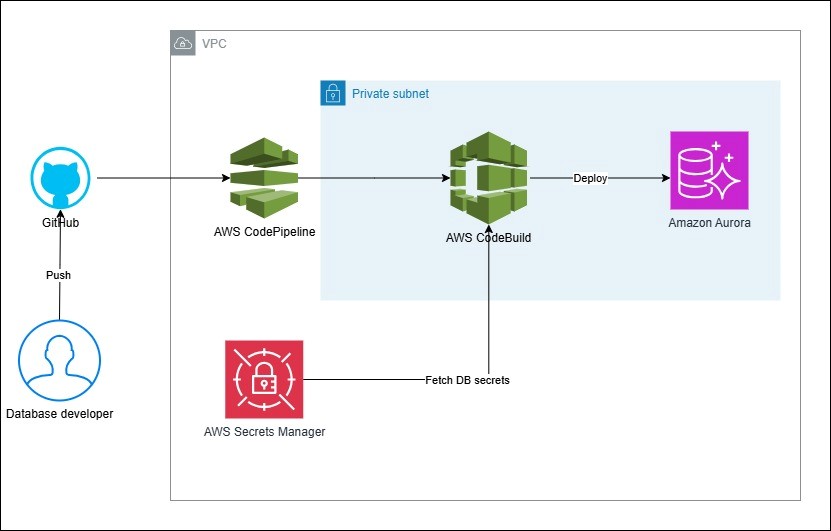
The following architecture diagram illustrates a continuous integration and delivery (CI/CD) pipeline for database development using AWS services. It allows for automated, secure, cost-effective, and efficient database development and deployment processes, using AWS Cloud services for CI/CD pipeline management and secure secret handling. This architecture diagram shows the way services are used and doesn’t factor in all other AWS services you may have in the account.

The workflow consists of the following steps:
- The process starts with a database developer who initiates changes and pushes code changes to a GitHub repository. GitHub is used as the version control system. You can use any other Git-based repository supported by CodePipeline for this purpose.
- When changes are pushed to GitHub, they trigger CodePipeline, which orchestrates the CI/CD workflow.
- CodePipeline then triggers CodeBuild, which uses Liquibase (an open source change management tool) to deploy the database changes. You can also use other tools such as Flyway or migrations generated by an ORM.
- During the build process, CodeBuild fetches database secrets from Secrets Manager. This provides secure handling of sensitive information such as database credentials.
- The final step in the pipeline is deploying the changes to Aurora.
Prerequisites
For this walkthrough, you need the following:
- An AWS account.
- An AWS Identity and Access Management (IAM) role with permissions to create and modify resources for Secrets Manager, CodePipeline, CodeBuild, and Aurora.
- An Aurora database. For this post, we use Amazon Aurora PostgreSQL-Compatible Edition. You can also MySQL with updates to the driver and connection configuration.
- A database user that can connect to the Aurora database with access to create and drop tables.
- A GitHub repository. For instructions to create one, see Creating a new repository.
- The Git client installed and configured to connect to the GitHub repository and push the database code.
Store the database credentials in Secrets Manager
In the prerequisites section, we mentioned the need for a database user to deploy database changes. This database user will be used to deploy and roll back the schema changes to and from the database. Use Secrets Manager to store these database user credentials. A CodeBuild project will be configured to retrieve them while the build happens.
In the example that follows, you store the credentials of an Aurora database named code-pipeline-demo-db.
- On the Secrets Manager console, create a new secret.
- For Secret type, select as Credentials for RDS database and enter the database user name and password.
- Choose Next.
- Enter the information for the Secret name and Description
- Choose Next.
- Turn on Automatic rotation (optional but recommended).
- Choose Next and then Store.
Set up CodePipeline with a CodeBuild project
Now let’s create a pipeline using CodePipeline for continuous delivery and with a CodeBuild project component to invoke Liquibase.
- On the CodePipeline console, choose Create pipeline.
- Enter a name for the pipeline and choose Next.
- Select GitHub for Source provider and choose the repository or branch. If you haven’t established a connection to the GitHub repository, do so now.
- Keep everything else as default and choose Next.
- Choose AWS CodeBuild for Build provider.
- Create a CodeBuild project by choosing Create project.

- Enter a project name and continue. In this example, we use a default build of an on-demand Amazon Elastic Compute Cloud (Amazon EC2) instance and an Amazon Linux managed image.
- Expand Additional configuration under Environment.
- Choose the virtual private cloud (VPC) where the Aurora DB instance is hosted, subnets that CodeBuild should use, and the VPC security groups.
As a security best practice, we recommend that Aurora DB instances are created under a private subnet with no public connectivity. The security group that you select will be attached to the CodeBuild EC2 instance that will access the Aurora DB instance during the deployment process. When CodeBuild creates the EC2 instance for deploying the objects, it should be in the same subnet where the Aurora DB instance is hosted.
Make sure there is a NAT gateway route created for this subnet to access the internet so that CodeBuild can fetch the artifacts. For more details, see How do I set up a NAT gateway for a private subnet in Amazon VPC.
- Leave the rest of the configuration as default and choose Validate. You should see a success message as shown in the following screenshot.

- Fill out the Buildspec In this example, we specify installing Liquibase onto the CodeBuild EC2 instance, the required PostgreSQL package (including the driver), Java to run Liquibase, and the command to execute the Liquibase update.
- Choose Insert build commands and enter the following code. Replace <://<code-pipeline-demo-db.XXXX.us-east-X.rds.amazonaws.com:5432/test> and <username> with the database and user details. The password is fetched from Secrets Manager through an environment variable DBPASSWORD, which we explain later.
Explainversion: 0.2
phases:
  install:
    commands:
      - wget https://github.com/liquibase/liquibase/releases/download/v4.27.0/liquibase-4.27.0.zip
      - unzip liquibase-4.27.0.zip -d liquibase
      - sudo mv liquibase /usr/local/bin
      - chmod +x /usr/local/bin/liquibase/liquibase
      - rm liquibase-4.27.0.zip
      - yum -y install java
      - sudo yum install -y postgresql15

  build:
    commands:
      - /usr/local/bin/liquibase/liquibase --defaultsFile=liquibase.properties --url="jdbc:postgresql://<code-pipeline-demo-db.XXXX.us-east-X.rds.amazonaws.com:5432/test>" --username=<username> --password=${DBPASSWORD} update
- Choose Create project.
Now that you have created the CodeBuild project, you can complete the creation of the pipeline.
- Open the CodeBuild project and enter the following values under Environment variables:
- For Name, enter DBPASSWORD.
- For Value, enter <Secret Name>:password.
- For Type, choose Secrets Manager.
- Choose Next.

- Skip the deploy step and create the pipeline.
You’re now ready to push the database object changes and deploy them in the database.
Push the database code to the repository
In the prerequisites, we mentioned a local machine that can connect to the GitHub repository through a Git client. Refer to Adding locally hosted code to GitHub to learn more. For Liquibase, the changes can be specified in SQL, XML, or JSON formats. In this example, we use the SQL format. The following snippets show a Liquibase-formatted SQL file pushed into the main branch of the repository in GitHub. The file name is changeset.sql. This file is holding the code for deployment into the database.
In the repository, we pushed a Liquibase.properties file:
Explaindriver=org.postgresql.Driver

# Path to your changelog file
changeLogFile: changelog.sql

# Specifies the verbosity of the log
logLevel: INFO
We also pushed changelog.sql as follows:
Explain--liquibase formatted sql
--changeset public:1
create table test1 (
id int primary key,
name varchar (255)
);

--rollback drop table test1;
After you push these files, CodePipeline will pick them up from the repository and initiate a build using CodeBuild to deploy the changes to the database. We recommend creating an optional stage for Liquibase rollback in the same pipeline to safeguard against accidental deployments and invoke them if and when necessary.

Liquibase limitations
Liquibase recommends against using Liquibase tools to manipulate or manage the databases of prepackaged commercial off-the-shelf (COTS) software, unless the vendor of that software explicitly supports Liquibase. COTS software refers to prepackaged software products that don’t require extensive customization or development. Additionally, Liquibase tracks changes inside the database via a database change log table which creates a dependency on the database that it is deploying to. Refer to Liquibase Limitations and Solutions for more information. In cases where Liquibase is not ideal, you can choose another database change deployment tool such as Flyway and integrate it with this solution.
Clean up
To prevent incurring charges, complete the following steps to clean up the resources created during this demonstration:


Leave a Reply